
DIY Ribbon Microphone - Operation Principles
Ribbon microphones operate employing the effect of electromagnetic induction. When You place a moving conductive body into a permanent magnetic field, the body generates an electric signal. Simple harmonic motion of the body generates the electric signal of the same form. This is the same principle as used in pickup-string interaction in electric guitars.
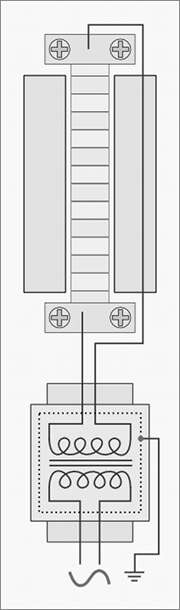
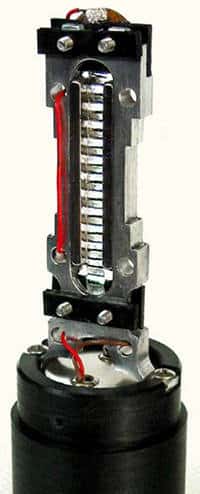
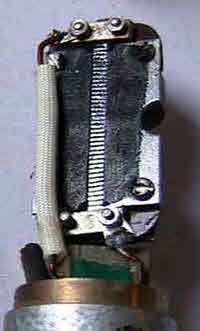
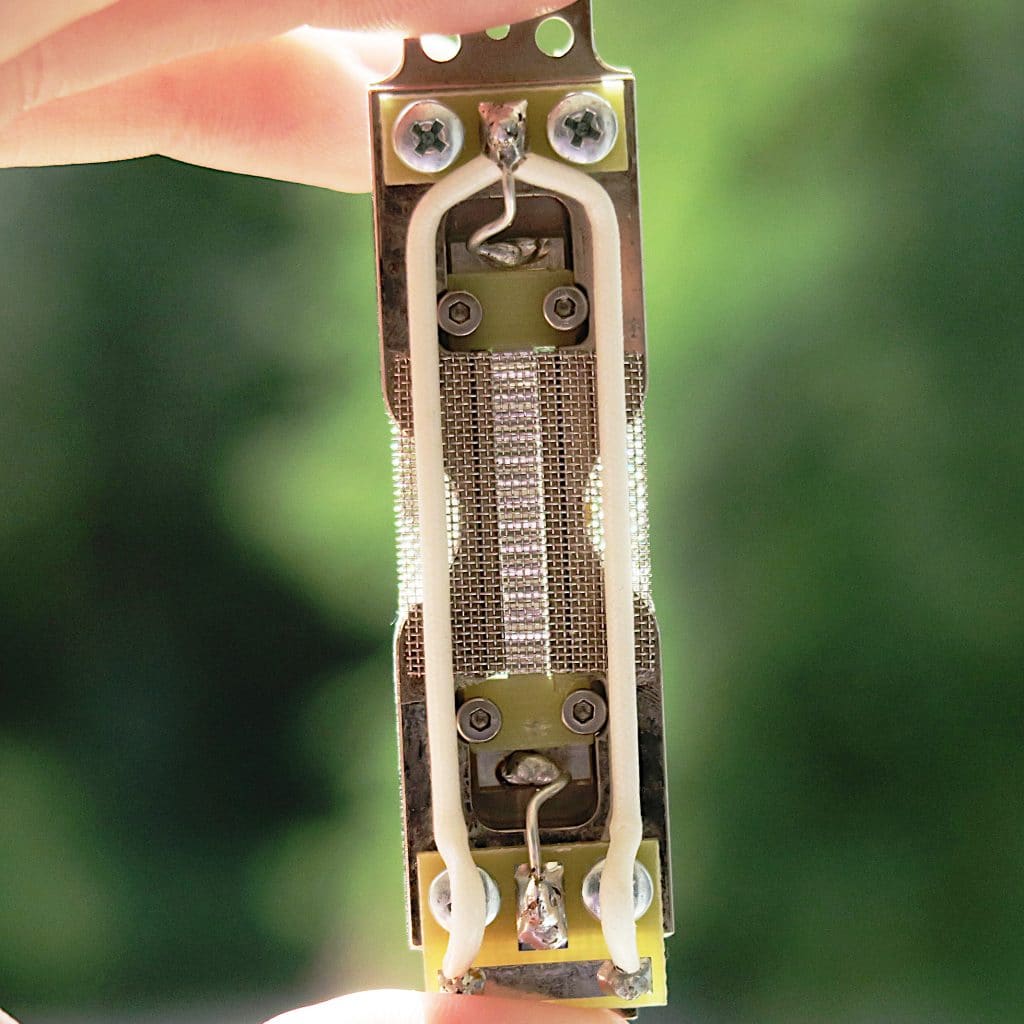
The heart of a ribbon microphone is its “motor”, the assembly, that actually transforms a kinetic energy of a sound wave into an electric signal. The ribbon microphone motor consists of a very thin (1.5 – 5.0 microns) aluminum foil strip positioned between two permanent magnets. The foil vibrates when exposed to a sound source. A flat piece of foil can hardly vibrate because it is made of dense material and is not elastic enough. That’s why the foil gets corrugated, giving it a spring effect and providing required elasticity for the ability to get motivated by a sound wave. A corrugated foil strip is called a ribbon.
A ribbon functions similarly to a string in electric guitar. The difference is, that in the case of electric guitar the signal gets induced in the wire wound coil of a pickup, but in our case the signal gets induced in an aluminum ribbon itself. Such approach gives very high linearity and authenticity of a signal (which is not the case with electric guitars), but provides very low output level.
Output Signal Level
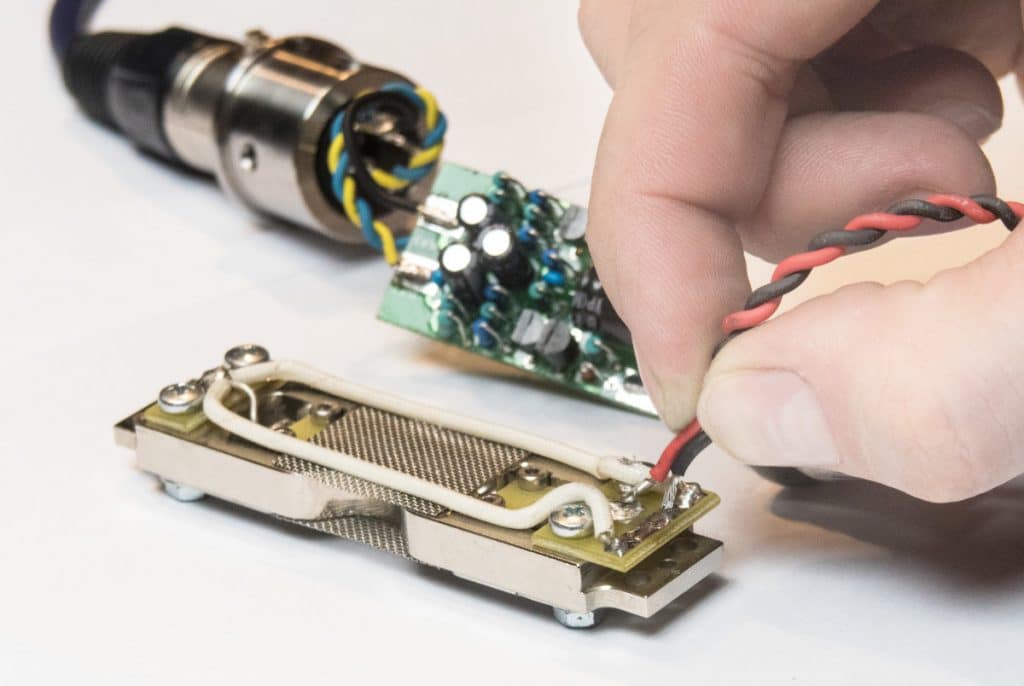
Output signal level of a ribbon motor is usually around 100 microvolts (0.1 millivolts) or about 50 times lower then the output of a regular moving coil (dynamic) microphone. To raise the signal up to a reasonable level, usable by regular audio equipment, a step-up transformer is used. Historically, the most widespread transformation ratio of ribbon microphone output transformers is 1:37. It means, that the voltage induced in a motor gets amplified by 37 times. This value provides an optimum balance between output signal level (which is still quiet low anyway) and output impedance of a microphone. Why transformer? Factually, a transformer is the only option to amplify such low signals because modern active circuitry wouldn’t be able to keep reasonable noise floor in this application. Transformers, on the other hand, are virtually noiseless. They have other problems, but when the noise level is the critical issue, transformers are still irreplaceable in audio circuits.
You may ask – why don’t we use a transformer with a higher transformation ratio to get a higher signal level? As I’ve mentioned, the reason is the output impedance. It is difficult to explain what impedance is in few word, but I can explain You the idea. Every signal source has its output impedance and every signal recipient has its input impedance. To get the best voltage transfer (note, that audio-signal is represented by voltage, not current) an input impedance of a recipient should by at least 10 times higher then output impedance of a signal source. Nowadays most manufacturers claim that 5 times is enough, but knowing that all the quality standards are slowly (or rapidly) going down, most audio engineers prefer to follow an old-school approach. Insufficient input impedance causes a signal level drop with additional distortion for sources with active electronics and signal level drop with earlier high frequency roll-off for inductive sources (those, that end up with a transformer – our case).
The problem is, that when we increase the transformation ratio, the voltage is amplified linearly, but impedance gets increased quadratically. If we have a transformer with the ratio of 1:37, which is standard, we will have the voltage output multiplied by 37 times, but output impedance multiplied by 37^2 = 1369 times. It can be considered fine with such transformation ratio, as output impedance of a ribbon microphone motor is usually around 0.1 – 0.2 Ohms, so multiplying it by 1369 gives us approximately 150 – 300 Ohms, which is, in fact, a marginally acceptable value, taking into account that most of modern preamps have input impedances of around 1500 Ohms or even less for cheapest end.
So, increasing the transformation ratio further will make the microphone hardly usable with any, but high-end studio preamps that can feature input impedances of 8 – 12 kOhms (some even up to 20 kOhms). If You are lucky to have one of these, then You can go for transformer with 1:50 ratio (giving You an output impedance of about 500 Ohms), but going further up is impossible without using a FET-based active impedance converting circuitry (making so-called “active ribbon” microphone), which is another story, not to be covered in these articles.
Back to the motor now. In general, there are two main parameters, that define the output signal level of a particular ribbon microphone motor. These are the mass of a ribbon and the strength of magnetic field. The signal level raises in reverse proportion to the mass of a ribbon and in direct proportion to the strength of a magnetic field.

The lighter the ribbon gets, the higher signal level we achieve, thus thinner ribbons give hotter output. That’s also one of the reasons why aluminum is used to make ribbons – it is one of the metals with lowest density (“lightest” metals). Of course, there is a downside in using thinnest foils – as thinner the foil is, as more complicated it is to work with it, and as more fragile is the ribbon in a final assembly. The most reasonable foil gauges are between 2.0 and 3.0 microns, providing very good mass to usability attitude. Ribbons below 1.5 microns must be handled with extreme care during sessions and work with such foils can turn into a real nightmare. On the other hand, ribbons of 4.0 microns and above don’t provide expected sensitivity and sound much duller.

Of course, You can also vary the signal level by varying the dimesions a ribbon. While the reasonably usable range of foil gauges is quite narrow, the width of a ribbon can vary between 1.0 – 6.0 mm (0.04″ – 0.25″), so if You make ribbon twice narrower its mass will be reduced by half too, giving You about twice output signal level. Again, as narrower is the ribbon, as more complicated is the work. Narrowest ribbons take huge effort to make and to settle in place, but wider ones are not that difficult to handle.
The second parameter, the magnetic field, improves proportionally to the volume of magnets. If we use twice bigger magnets of the same grade we will double the strength of magnetic field. Seems straightforward – we can use bigger magnets to induce a hotter signal in a ribbon, but the size of magnets, in fact, is the downside.
Frequency Response
Why bigger magnets are the downside? The answer is in the main spec of any microphone – the frequency response. The fact is, that the frequency response of a ribbon microphone depends strictly on the size of the assembly, precisely on the length of the path from the front of the ribbon to its back. As longer it gets, as earlier high frequency roll-off we will experience. Logically, as longer is a perimeter of a magnet, as longer is the path. Don’t forget, that we do also have a chassis, so it adds to perimeter too.
The conclusion is that the design of a ribbon microphone is always a compromise between the wide frequency response (smaller magnets, narrower foils, high complexity of work) and the high output signal level (bigger magnets, thinner foils, much pain in the…).
The good news is (as You might guess) that technologies have been improving during last 70 – 80 years and modern materials allow to make a ribbon microphone with very good specs, such that were completely unreachable in the era of classical ribbons. Mostly it is due to invention of neodymium magnets in early 80es, that are incredibly strong comparing to regular ceramic magnets of the same size.
So, yes, You can make a good ribbon microphone and save Yourself a bunch of money, the only two things needed are a thoughtful and smart approach to design and a big patience. Now, when You have the basic idea of factors that affect the performance of a ribbon microphone, let’s dig into details…